If you haven't experienced it yet, you will. It may not be today; it may not be tomorrow, but rest assured that the day is coming. You will sit down on a Sunday evening, put a show on in the background, load your lesson plan document and begin the preparation of engaging, thoughtful and well-planned lessons. Then, it happens. At first, you think maybe everything hasn't fully loaded yet. Then you figure a quick reset might do the trick. At that moment, you realize the truth...Lascon's lesson plan template is laggy! In a fit of rage, you hurl your computer at the wall in disgust.
When that day comes, I know that I can expect an email telling me that it's time we had a talk. All I can tell you is that my heart was in the right place. I didn't want this. No one wanted this. That being said, I can assure you that I can do better. Rather, I will do better!
So here we go...drumroll please...introducing...Digital lesson plans 2.0!
The problem could have been foreseen. With the passing of each week, with more content being added each and every day to the document, it was inevitable that your lesson plan document was soon going to start looking and acting like...
The good news is that we have an easy solution to the problem. Starting now, you will find another document in your lesson plan folder, creatively named "Quarter 2" lesson plan document. This document will begin with Week 11 (Oct 31st- Nov 4th) and will run through the rest of the semester. Decreasing the content will preemptively solve our lag issue. Regarding next semester, I will create two additional lesson plan documents for what I have intuitively named "Quarter 3 & Quarter 4" lesson plan documents. As I have done previously, I will create both templates and you can utilize whichever you prefer and discard the other. If you have any additional questions, please feel free to contact me.
I apologize for the inconvenience and all I can say is...
You've taken the time to create your assessment, it has been administered throughout your department and now you are ready to make some data driven decisions! All that is missing is...the data. Here are the steps to get to your AMP data.
*Remember, you have the ability to access both the overall results and the mastery data that highlights individual standards.
Data Directions
From the Schoology homepage, click the "Assessment Reports" tab located on the left side of your Schoology homepage. (See figure 1, step 1)
Once within the assessment reports, you will first need to select the type of report you would like. Toggle the "Assessments Report" arrow and select either, "Overall" or "Mastery" results. (See figure 1, step 2)
Once you have selected what type of report you would like, toggle the "Assessment" arrow located under the "Assessment Report" section. Select the assessment that you would like to view. REMINDER: You have access to view any assessment that was created within the AMP group(s) that you are included in. (See figure 1, step 3).
Figure 1
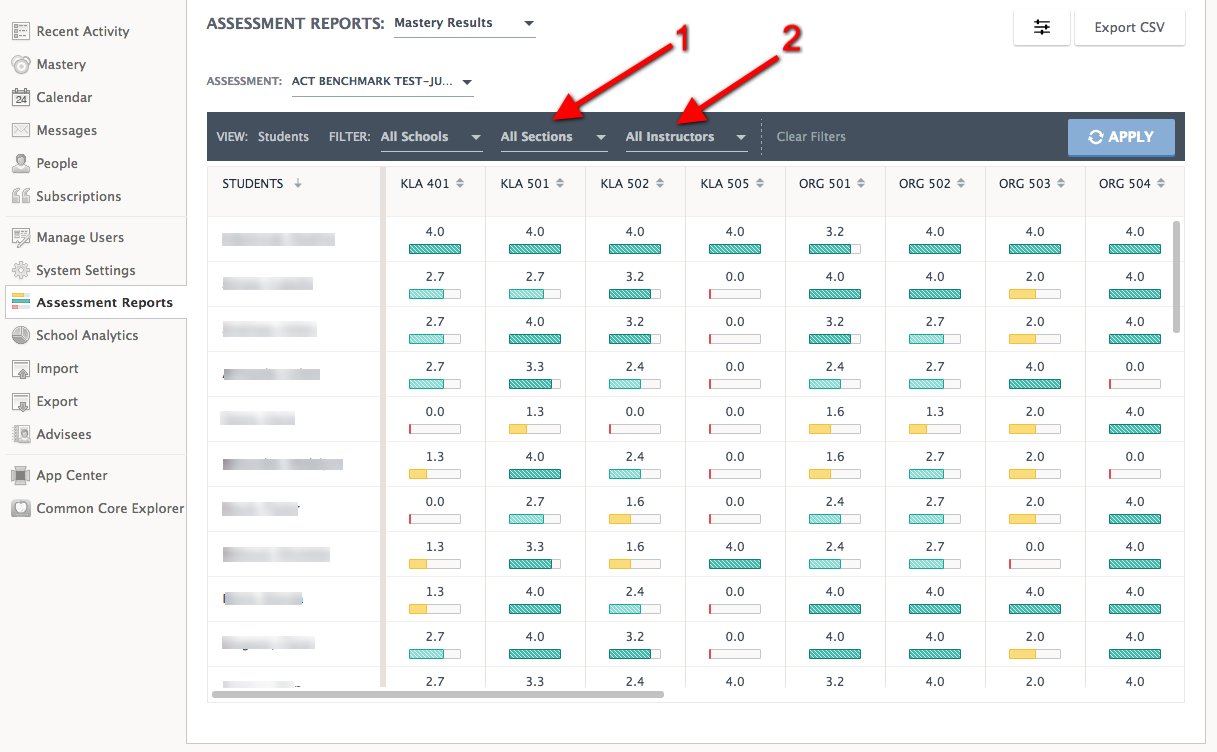
Once your selected report has loaded, you now have the ability to make additional adjustments to the data you are viewing via the "Filters" options located above the data. You can toggle either what specific course section you viewing (see figure 2, step 1) and/or what instructor you would like to view (see figure 2, step 2). This allows for a more specific viewing of your assessments. If you have selected any filters, please select the blue "Apply" button to customize the data you are viewing.
Figure 2
It should be noted that Schoology will be adding even more functions to the data assessment tools in the future. This will allow us to utilize the data for even more specific purposes. If you have any questions about accessing and/or viewing the data, please feel free to contact me.
Well, it's that time of year again. Midterms! Some of us can recall the anxiety that this time of year provoked in us growing up. I know I can sympathize with students who are preparing the following scene to perform for their parents next week...
We wish these students the best and can only hope it is a one time performance!
Now, on to some exciting news! Cast for Education is now ready to be used in your classrooms! I will pause to allow this to sink in...
No? That Gif (it should be noted that I don't care what the inventor of GIF's says, it should NOT be pronounced like the peanut butter!) doesn't do it for you? It doesn't quite capture your excitement? Try this one...
Now that we have accurately captured your excitement, let's talk about how and why you may want to utilize Cast for Education. Cast is going to give your students the ability to wirelessly share their Chromebook screen onto your own screen. Assuming that you have your laptop/Chromebook connected to your projector, your students will easily be able to share their screen with the class. Not only will this functionality streamline the process of student presentations but more importantly, it is a nice addition to the collaborative learning experience! Now, with the touch of a button, students can share what they have discovered or been working on with their fellow classmates!
Setting up and using Cast for Education has been made user-friendly but did require the setup and use of Google Classroom. Fortunately, utilizing Hapara Teacher Dashboard, we were able to discover a work around that streamlines the setup process and removes the need for a teacher to setup an account with Google Classroom! So why don't we get everyone setup and ready to start casting?! 1. On your Chromebook, begin by opening the app named "Cast for Education." To do this, click on the circle icon located in the lower left of your screen and if you don't see the "Cast for Education" app listed, select "All Apps," find and then click on "Cast for Education." We have recently pushed the app to each teacher's Chromebook, but if you cannot locate the app, try doing a restart of your device. Once the app has been located and clicked, this will launch the app allowing for further setup.
Image 1
2. Once the app is running, if you are not automatically prompted, click on the "Settings" icon located in the upper right hand corner of the app. Within "Settings" you need to insert a "Receiver Name." This name is what students will see when they are searching for a computer to "cast" to. For this reason, we recommend using something like the subject you teach with your class number or your name with your class number (i.e. Tech Leadership 121 or Lascon 121). Once you have created a "Receiver Name," simply click "Save." (See Image 1)
3. Once back at the main Cast page, click on the blue "Share" icon located next to the "Settings" icon. For another user (in most cases a student) to "cast" their screen to yours, you first need to enter an email address and decide what level of permission the user is allowed. Fortunately, we have a work-around that removes the need for you to enter each student's email address! (See Image 3)
Image 2
4. At this point, go to Hapara Teacher Dashboard, select a course and go to "Class Info." Once inside the "Class Info" page, you will see an email address located under the course name. This email address is for your whole class. Copy this email address, then return to the Cast for Education app and paste the email address into the grey box located under the "Add People" heading. (See Image 2)
Image 3
5. Once the email address has been entered you have a permission setting to select (located next to the grey box). You can either toggle the setting "Can Present" or "Can Request." My opinion is that it is best to select the "Can Request" option for classroom use. If you select, "Can Request" when students go to cast their screen, a dialogue box will appear in the bottom corner of your screen asking if the student can share their screen with you. You can then select approve or deny. (See Image 3)
6. Once you have entered the email address and selected a permission setting, click on the grey "Add" button. Please repeat these directions for any additional classes that you would like to have the ability to cast to your screen. (See Image 3)
7. After you have entered the class email addresses for all the courses that you would like to have the cast ability, click on the "save" button. That's it! You are now ready for your students to cast to your screen! (See Image 3)
Remember, you can always go back into the share settings and adjust share rights and permissions if needed. If you would prefer a video tutorial on the topic, please watch the video below.
For anyone interested, the Inspirational Education Video of the Week on the Instructional Tech website has been updated. This week's talk features Tom Rademacher speaking about how he changed the nature of his assessments and content so that what he delivered in the classroom would pass the "Google Test." Enjoy, and as always, feel free to contact me for any additional support or questions!